Raleigh Panasonic Team Replica 12 restoration
24/10/2020
Without a doubt, the Raleigh Restoration Group on Facebook has yielded the most interesting results. I’ve started a conversation with a gentleman named Neil McGowran, who is Operations Manager for a bike store in Newcastle. A number of people have suggested that I speak to him and it seems he’s widely regarded as the oracle of all Raleigh knowledge. In addition to meeting Neil, the strangest thing happened: another member of the Raleigh Restoration Group is a gentleman who used to work in the amazing little local bicycle shop in the town where I grew up. I even remember constantly being in there after school and at weekends, just relentlessly annoying the staff with a thousand different questions. So David has been extremely patient with me asking him a thousand more questions some 35 years later.

So the measurements L1, L2, L3 and L4 are what I’m interested in.
In addition to my attempt to determine why the stripes don’t line up – to which I’ve still had no satisfactory answer except a suggestion from David that it might be something to do with how they look on different frame sizes – I’m also exploring another potential modification that I pondered, filing down the three rear brake cable holders that run along the top tube, drilling a flush hole at either end and taking the cable internally. Almost everyone I have spoken to has pleaded with me not to do this! But I’m still undecided. The determining factor will be whether or not this will in any way weaken the frame. And to understand this, you have to understand the complexity of Reynolds 531C tubing – you see, Reynolds patented a new method of making stronger, lighter bike frames way back in the late 1920s. It’s called double butting and it involves a process where the front and end parts of the inside of the tube are thicker and the middle is thinner, while the outside measurements remain unchanged.
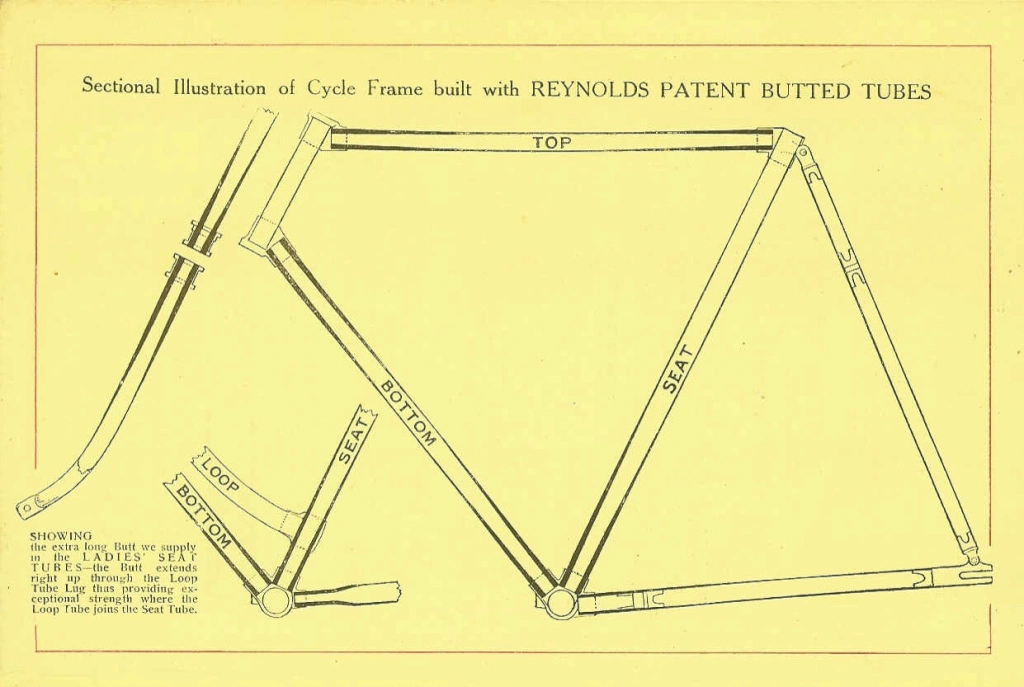
This scan from a Reynolds catalogue apparently from the 1920s helps visualize how the frame connects together
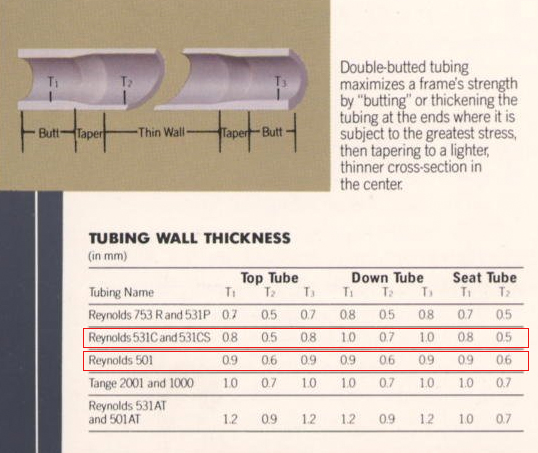
According to the Reynolds website, “A butted tube is one where the outside of the tube is a constant diameter (usually 25.4, 28.6. 31.8, 34.9, 36.4 or 38.1 mm) and the wall thickness varies. On double-butted tubes the thickness of the tubes at both ends is thicker than in the centre, so a typical double-butted tube (0.8/0.5/0.8) would have a thickness of 0.8mm at end (1), a taper portion, then a centre section of 0.5mm, a taper portion, and a thickness of 0.8mm at end (2). This is used for the top and down tubes. When a lugged frame is being constructed, the seat tube would be single-butted. So at the bottom bracket end, the tube would be 0.8mm thick, there would be a taper portion, and then the 0.5mm would continue to the top of the tube, to allow the seat pillar to be inserted.”
I called Reynolds at their HQ in Birmingham and spoke to very helpful young man named Tom. I asked if they had any records going back to the 80s and basically, he said it was extremely unlikely, although he would double check. The Reynolds tubing was made, in this instance, 531C tubing featuring the double thickness – or double butted – ends and then shipped off to Nottingham, for Raleigh to connect with the structural joints, called lugs, and then brazed together. All by hand.
So, it would obviously be better to drill into the thicker part of the tubing, but there’s no way to determine where that might be. It could end an inch from the lug, or three inches. Tom said that typically – and he stressed this was a guess as much as anything else – the double butt section extended 50mm from the end of the tube, then there was a transition of 40mm before the main, thinner length of the tube. And when you factor in the dimensions of the lugs, that doesn’t give me much space to work with. I wonder if I could get the frame x-rayed somewhere…
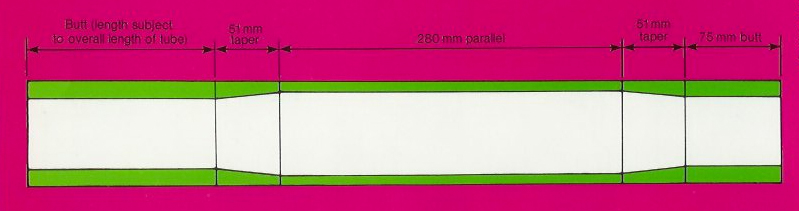
There’s a great blog called Kuromori, that has an extensive section on Reynolds 531 tubing and there’s another called Randonoodler, that features an image of a cross section of the tubing as it appeared in the 1985 Trek brochure, this indicating the thickness. Plus a garish image apparently from the Reynolds Tubing 1978 catalogue that suggests a minimum of 75mm butt, with a 51mm taper. But if there’s a section of over-run, that was cut to length, so to speak, that could be an unpredictable variable.

If the butting is indeed 50mm, it might be possible (click for full-size image)
The 1920s catalogue suggests there’s a 3-inch double butt, with a 2-inch taper before you get to the think wall section. So I think Tom’s guess might have been about right and maybe I should assume it’s about 50mm butt and about the same again for transition at both ends of the top tube. I’ve asked for people’s input on this, on various forums and group pages, and the consensus seems to be – leaving the abuse this seems to be attracting aside for a moment – don’t do it. Despite the fact that I wanted to make this into a bike I could use every day, David gave me a very usual piece of advice – you don’t want to start drilling holes in a 36-year old frame. And for at least five hours I came around to this way of thinking…that was until someone on the Facebook group said that he’d done exactly this with a 531c frame and had no problems whatsoever. So now I’m totally tortured.
+ + + THIS PROJECT IS STILL IN PROGRESS + + +